Sunday 31 May 2015

Music Video Shooting and Editing Tips


Recently I completed a mammoth music video edit for the Post rock band "Tidings" for their song "On His Wings Hung Regret and Remorse" a nearly 10 minute track.


This was a large learning experience as this was done on a budget of £0, and was for a song which was 10 minutes... 10 MINUTES!!!
Most pop songs being around the 3 minute mark are hard enough to shoot and edit but this one was an extra difficulty of how do I shoot multiple angles multiple takes of a whole 10 minute track?

So here are the tips.

1) Have the band playing to the finalised (or mastered) track, so that you know timing is spot on and you are not having to mess around with trying to time a different sounding video with audio recording.
     1b) if you are having the track pumped through the speakers but it is being output by something like a phone, make sure you have the phones wifi or mobile connection off so that it won't get a phone call mid way through a 10 minute shoot and completely screw up the timing or result in the cancelation of that take.  massive pain in the butt.

2)  Shoot the song all the way through!
I contemplated breaking it down into halves but this would be a bad idea, and involve exponential more editing and fannying around in post.
If it is a 10 minute song, prepare the band that they will be playing that whole song multiple multiple times. In this video's case we went through the whole song 15 times.


3) Multiple cameras use them.
I shot with 4 cameras on this shoot. Nikon D800, Canon 5dm2, Canon 550D, and Panasonic GH4
and shot with lenses (Canon 16-35mm f2.8, Tamron 24-70vc, Tamron 28-75mm, Samyang 85mm f/1.4)
However be aware that each camera has its own unique look with its own idea of how to render certain colours, contrasts  and levels of saturations. and on top of that each lens has its own contrast, sharpness and vignetting characteristics.  If possible to rent 4 of the same cameras with similar lenses then that would be so much easier to calibrate all the video files at the end of editing. However financially that could be a pain in the butt especially on a budget of £0.


3b) if possible to shoot it all in black and white as I did, deffo shoot in black and white, not in colour and edit in black and white (will expand on this when talking about editing part) Colour, with multiple cameras and lenses and settings added a bollock load of colour editing in post.

4) Tripods... or assistants?
tripods are handy for holding cameras stationary... but a lot of the time during a video like the one I shot, the stationary shots suck ass.  a few of the shots I added "handy cam" vibration to the clips to give it some more movement. My personal advice is if shooting a dynamic moving video use some form of stabilised but moving camera, Glide cam and chest cam style definitely give a bit more depth to the shots.
I use a mini tripod strapped to my belly. this one http://amzn.to/1FNfCvc
see here


and here


If you have the chance of using an assistant to hand hold (with strap around neck for vibration reduction) another camera and lens and have some idea of how to manual focus a lens while moving, then that is far better than 3 tripods taking dull inactive footage.


5) Smoke machines are awesome.
however having consistency in smoke density between potentially hours of different takes requires someone almost full time to be pumping at it and monitoring it, especially if there is a half time break for lunch and the smoke all fades way.

6) Put pressure on the lighting guys. If you are in the fortunate position to have someone else deal with the lighting, and brining in their own lighting, such as LEDs strobes and projectors make sure they know how important their job is. Your job is composing, structuring, camera settings, camera control etc. lighting is a whole extra job, get someone to take control of that for you.
In the end, the more lights the better. There will never be the case of if someone asked "should i bring this light from blabla" should you ever say no.
construction lamps are also good for background/rim lighting.
I used 3 of these 400watt construction lamp for background lights to shine through the smoke


We also used 5 led, 2 projectors and a robot light.

7) Set up time is time well spent
we spent a lot of time setting up, brining in all the speakers for the background, tarp'ing up the windows to remove any light, and working on all the cabling. the more time you spend setting up at the start the more you save from having to fanny around re-arranging mid shoot.

8) The first take is always shit.
energy is low, comfort is low, and almost none is in the zone.  two options there. 1)just don't even bother shooting.
2) shoot just to get an idea of the lighting angles and audio capture
3) just do close ups on some of the instruments.

During this shoot the first take which was 4 cameras recording the 10minute track (45minutes video footage once you add all the intro and outtro recordings) the group energy was rubbish and the angles and takes were never used in the final edit.
The best takes were 4-8 takes in. and 3 takes after lunch break.

9) Have laptop and external hard drives on site to empty memory cards between each take. if you have the opportunity to have an assistant that can dump the files where you are onto the next take that will massively speed up the process.

10) do whole takes on each member, although it may be very tempting to move your camera from one member to the next mid take, just leave that for the editing. and on each shoot do a full take on one member.  it makes it easier in editing when you can label shots as "Group', "Group movement", "Member 1", "member 2", etc rather than, "2 minutes member1 then swing to group then swing to member 3" etc as a single take.

11)  If planning on doing Slow Motion, for example some slow mo drum shots or something like that, be aware, that this doesnt really work if you are trying to sync it up to the music and ends up just looking odd or out of sync or like there is another drummer there.  slow mo may just work best for abstract shots, or Story style music video not Gig style music video.


Now, onto the editing

1) Prepare for a time black hole.
Hours will be spent and yet only 10s of seconds will be edited.

2) Know your editing software inside out, do not do this as a learning platform! You will screw up and you will rip your hair out or punch walls.

3) The more prep you do at the start of editing the more fluid your editing can be days down the line.
Do Not rush at the begining.

4) If your software has some form of automated clip allignment or sound sync give it a try. however if there is any thing off beat later down the line it can take hours to figure out where the software has mis-heard and screwed up.  if you can see the wave forms (usually the drum beats) go manual and line it up with the master track you have.


Now from here on in the editing tips will be specifically with regards to Editing in Final Cut Pro X

5) When importing import and select both Proxi and Optimised media, this will take up a load of memory so be prepared, but will help keep flow later on when you have 200 edits already done and you are working on the next 5 seconds of footage and you cant be bothered waiting minutes for it to stop crashing.


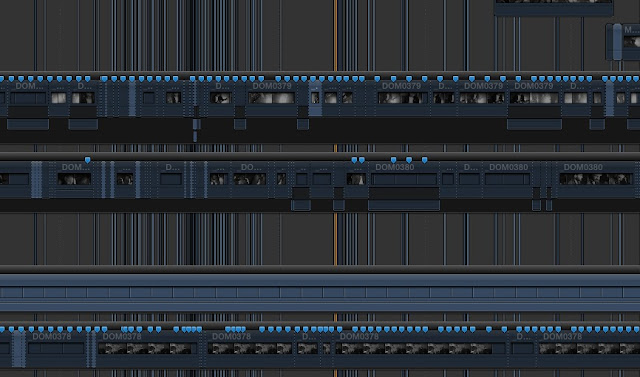
6) The sound on the recorded video tracks is likely to be total mush as the speakers in the event will have been pumping out a billion watts of sound so trying to see the beat blips on the video tracks will be very difficult so this is where you have to go and manually mark the beats in a whole run through.
on one video track play it through and click "M" for Mark and a little marker lands on the clip time line so you can see later on where each beat is, insted of having to look at frame by frame shots of drum hits or constantly hunting for the tiny blips later in editing.  This is the manual way of syncing up your clips. and most accurate.
On a 10 min song, this takes 10minutes.  when you have 60 full length clips of the 10 min song... it takes a few days to go through it all, but it will be invaluable later on. DO IT!

6b) cut the music to the beat, fast cuts for hard beats of the drum, slower blended/crossdisolve cuts for longer guitar strums.

7) Dont delete or cut any footage out of any of the time lines, only use the blade tool on the section you are not wanting to use then click on the section with the "V" to make it inVisible (it becomes faded in the time line and is not used in the edit screen. This means you are not for ever going back and finding bits that you thought would be good to cut out or trimmed just a tad too much.

8) If you are planing on doing a super fast blur kinda shot where it looks like almost a different clip every frame of the video... guess what, it is, and I do not know a quick way around other than zooming in hard and selecting frame after frame after frame.
This time will suck. as you will work for 3 hours and find you have only done 0.5 of a second

9) only at what seems like the end do you then think about contrast/ colour editing. I shot in black and white to avoid colour grading from 4 different types of cameras and insted thought it would be easier and quicker just working on contrast. I was right.  But definitly only do this once you are happy with the edit sequence, as once you start adding colour grading, that can take a lot of processing and slow the whole edit down if not at the very end.
9b) (if putting out rushes do it in sections, but like the first minute timed, cut, and colour graded) however be aware that if you colour grade one part and 4 days later you are then colour grading the second minute it can be an extra pain in the balls to match the grades for each minute, so leave the finalised grading till the END

10)  Then and only then do you start to think about adding special effects, graphics and logos.

Friday 22 May 2015

Buying Second Hand Camera tips

Paying for a brand new camera is insane, especially if you are paying UK store prices.  Online prices are already 20-35% cheaper than buying in a store in the UK.  However my preffered method of buying DSLR cameras is buying Second Hand.


many reason as to why buy second hand
1) vastly cheaper + sellers may have extra batteries etc
2) camera has been used a while and all things should be working fine
3) buying in person means you get a good play of the gear and know where the person selling it to you lives in case you have to return to chop their heads off for selling you a dud.
4) firmware updates have usually been released and loaded on
5) software like lightroom will already have all the codec for working on the raw files.

But before you go and hand over your cash there is something you need to assess.
Who was using the camera and how were they using it.
a camera used by a war correspondant that shot 200k photos in conditions that would make even tanks crumble... or a new dad who got a camera for xmas and quickly figured out it was far above his level to learn.
Cameras for sale with the later owner are the ones to go for.


Here are some tips when buying a Second Hand Camera

1) Buy in person.
2) Dont by total crap, if something was cheap and crap when it first came out, buying second hand at a cheaper price does not make it any less crap.
3) Double check other online prices for the item you are buying, check amazon, gumtree, ebay etc. so that even if you are getting a good deal you are not going to find a better deal just a week later online somewhere.
4) Dust and oil on the sensor is something you can complain about but very easy to fix yourself and get a better price.
5) check all the functions and dials work as expected, a lot of the time the sensor and shutter can be fine but the command dials and the power connections are the weak links.
6) If it doesnt come with a box, try and get a discount. a box is always a good thing.
7) check the connections with the lenses you have, if you have a brand new af-s vc lens check that the camera is communicating effectively with the lens so that the Vibration conpensation (reduction) is working in lens and also that the focus is working in and out accurately.  a dodgy auto focus system is impossible to see just by looking, you have to test your lens on it.
8) check memory card door and slot (bent connector pins can mean your cards are not getting in)
9) make sure you get the supplied battery charger with the camera otherwise that is something you will need to buy yourself very quickly.


Sunday 1 March 2015

Forth Road Bridge Photos for you to edit


It was looking like it was going to be a calm and clear evening with the potential of a great sun set so I went to South Queensferry just outside edinburgh where I go to take photos of the Forth Bridges.

Photos in this video were shot with the Panasonic GH4 http://amzn.to/1AqNkk9 and the panasonic ultra wide angle lens the 7-14mm http://amzn.to/1CcwDjc and edited via Adobe Lightroom 5 http://amzn.to/1CcwIUd


I have added a few of the photos, mostly the ones that were shot in an HDR sequence if you want to edit your own.
you can download them from this drop box link https://www.dropbox.com/sh/lqv93fmn6kunvkh/AAA8_bO0Gx5icd6njtKSF3iba?dl=0
the photos are in adobe DNG formate so you may need an adobe editor to be able to see them


Thursday 8 January 2015

Nikon D750 Review - still developing

I have gone and bought myself a Nikon D750  http://amzn.to/1tOcirQ  A full frame 24mp 6.5fps 1080 @60p recording Dslr.  In my first video I am doing an unboxing, a quick opinon on its feel, weight, layout and its high iso quality in video and photos.
As of writing this blog in January 2015 is valued at just under £1700 for used via Amazon

and £1750 via Calumet and Jessops for body only.


It is not all great.
The Weight, or the combination of greater unbalance of the weight of a large lens, and the quite sharp hand grip I have quickly found that it is not entirely comfortable to hold.
Lighter cameras are a good thing to have if you are also producing or using it with Lighter Lenses.  If your camera weighed 1kg, and your lens weight 1kg, then you hand was the mid point of balance, but if your camera is now only 755g and your lens is 825g as is the case with the Tamron 24-70, then there is a little bit of a tip towards the lens which can mean a little bit of pressure on your top holding finger. Which I suspect is of no importance if you are just taking a few photos but the thought of a whole wedding 7-10 hours with it.... it could feel like a permanent bruise.

Quiet mode
This is clearly bollox, on the Shutter Release mode dial (the second dial / sub dial on the top left) there are 2 specifically labeled Q settings, Q (for quiet) and Qc (for Quiet continuous) which Neither of which do ANY THING to Dampen the VOLUME of a photo being taken.  I can't figure out if it is the sound of the Big mirror flipping up or the shutter curtain opening and closing but either way it seems like all the movement during an image capture creates a hell of a noise and the Quiet mode is completely pointless.
Who would use it?  I have been told that the point of it is that you press the shutter, it takes the photo, then you can walk to another area to release the shutter....
How in holy is that meant to be of any use?  wild life shooter will have firstly scared away the wild life within a 1k radius, and then the sound of you walking away ... well thats just pointless.
wedding photographers. well firstly the initial noise is still there, and the noise and disruption of walking out of the room for each shot to just shut the shutter... totally ridiculous.
and it is not just me complaining, here was a comment i found on the first video i looked up
Here is my video demonstrating just how bloody noisy it is.


A bit like shouting "I AM WISPERING REALLY REALLY QUIETLY, YOU CAN HARDLY EVEN NOTICE ME" and everyone looking at you like an idiot.

Max shutter 1/4000th
A lot of camera nerds have had a massive period over this. Complaining that it has CRIPPLED the camera...
Its not. But... it is a bit of a WTF? Other cameras such as the Nikon d800, D300, D700 all managed to do 1/8000th. Which is nice and fast, but is there every a situation where a 0.00025th of a second exposure just won't do and you absolutely NEED a 0.000125th of a second exposure...
NO!
however it is a full 1Stops worth difference in exposure... so for the odd occasion where you are shooting in bright daylight on a pristine white ski slope with a fast lens of f/2.8 or faster and you are at your lowest iso of 100, and wanting to keep some form of shallow depth of field. then that may be something that is of almost any importance.
On the other hand restricting the shutter speed potentially lowers the speed requirements of the shutter, potentially meaning lower wear and tear and possibly the main reason is it helps keep price down some how.
But it is a bit duff when you get cameras costing 1/4th the price able to do it.  go figure

1/200th Flash sync
Again many tears have been shed over this but Nikon does provide auto-fp settings so you can go all the way up to 1/4000th of a second with any High Speed Sync flash, aka Nikon sb-900 so for those with the gear have nothing to fear.

NO AF-on button
I was initially on the fence about this, thinking do I ever actually use it.  Then I realise I use it all the time on my canon 5Dmark2 when in liv
e view about to video and need to catch focus.
I also think it is something that is used quite bit by sports shooters.
I also find it odd considering that Nikon decided to have a total of 3 info buttons (one is a simple "?' Combined with White balance and a key sign) another is a lower case 'i' and then there is an 'info' button above the D-pad)

HOWEVER if you dive into the menu settings there is a way where you can programme the AE-L/AF-L button to actually be an AF-on button.


OMG Flare PROBLEM!!!
in the process of suffering this problem - once i have i shall report

(in the end I never witnessed this problem however Nikon did do a recall and free service to all its cameras which I had a massive problem with as shown in this video)


Awesome Things
Astonishing 24.3 Megapixel sensor giving a monster resolution of 6,016 x 4,016
you can also stick on your DX lenses and get a very respectable 10 MP images @ 3,936 x 2,624 

12,600iso Clean images
Ok not totally clean, but with just a smidgeon of Lightroom noise reduction, I am hard pressed to tell the difference between 12thousand ISO on this compared to 400ISO on a Nikon D300 or Panasonic GH4.

Big 3.2 inch LCD screen
nice and big but as mentioned before - overly complicated articulation and not touch screen and in the end only a resolution of 640x480

1080@ 60,50,30,25,24fps
YESSSSSSSSSSS

Audio markers on screen and Stereo on camera mic
the least they should all have

2 SD Card Slots
nice, cheap, fast and readily available.  

WiFi (in camera)
Handy to have but almost totally useless due to the shit app 

Now lets look at the Images we get out of it.


I will 100% confirm that the quality in the images you get all the way up to the max native iso of 12,800 are astonishingly good! The sensor performance in this camera is easily one of the best ever created.
Its ability to keep sharpness and detail at high iso, the ability to push the image in post even at high iso, and the colour accuracy it keeps at high iso is beyond any other camera i have used (including the nikon d800).


Saturday 3 January 2015

New Idea For Storing Photos

I have a new idea for what we should all do with our photos especially the non-important ones we take!

But firstly,

We all should back up our photos! ALL OF THEM!

We should save them on multiple hard drives - and have them in different locations.

No point having the same stuff on 3 hard drives and then them all burning to death in a house fire at the same time.

Ah, but is photography not about having physical copies of your photos? YES!
so Print out all your photos!
Actually print them out multiple times and store them in multiple locations.

In the end you will have boxes and boxes of hard drives and old photos of no interest in multiple locations scattered around the country,  and all for what?

For me there are 2 types of photos

Professional photos and family photos.
Family photos are not just of your family, but of friends, parties, holidays events etc all the things that in the future you may want to look back on and reminisce.
My parents have a big chest of drawers in their house filled with unorganised family photos spanning back decades and all manors of camera types and it is fun going through them once in a while (like 5 years or so). Its important to jog our memories of times past, of fashions changed, and people that were in our lives. But those memories saved as only a few photos can be either misleading or forgotten. or worse, lost, burnt or damaged by water

Modern families take hundreds of photos every year, on their phones, iPads,iPods,dslrs, point and shoots and action cams, yet few of us will ever print them out, fewer will think about saving multiple copies on different hard drives and store them in different locations, or carry out routine disk maintenance on the drives to check their functionality.

So my idea is that for those non-important photos, those photos we took on our little hill walk, or our weekend holiday trip, or the few photos we took of ourselves at our friends wedding, we should so a little video essay of what, where when, who and why we took those photos and upload it to the internet for ourselves and family to enjoy in the future.  Unless the internet dies (which it might due to a giant solar storm) or youtube goes bust (- unlikely) storing that video of the photos you took, will be saved on your computer, on a hard drive and better yet, on the internet via multiple servers thanks to youtube. or vimeo or what ever subscription free video sharing site you wish to use (personally i would advise only doing youtube)


The videos do not have to be interesting or funny, but just a reminder and a insight as to the time and location that they were shot.  If you were to die, or loose your memory this is a handy way to keep those memories alive for your children or surviving relatives.